Time lapse on a budget
If you’d like to experiment with time lapse photography but don’t want to invest a lot of money into it you might want to consider the home-brew rig described here. It’s proven, simple, dirt cheap and produces pretty respectable results. The parts needed can be purchased cheaply online, in a pawn shop or second hand store, or you can use old and retired equipment you already have lying around.
If you frequent this site you have no doubt seen the time lapse movies we’ve made and after being asked numerous times, we are going to share our little secret on how it’s done on a budget.
To start you’ll need a camera, a cheap pocket or bridge camera from Canon. Other makes will not work, nor will Canon DSLRs (although if you have one of those what are you doing here). I repeat, you must purchase or use a Canon, more specifically one of the models listed below. This list is up to date as of January 2013.
A410 A420 A430 A450 A460 A470 A480 A490 A495
A530 (our current model), A540 A550 A560 A570 A580 A590
A610 A620 A630 A640 A650
A700 A710 A720
A800 A810
A1000 A1100 A1200 A1300
A2000 A2100 A2200
A3000 A3100 A3200 A3300
D10
ELPH100 ELPH300 ELPH310 ELPH500
S2 S3 S5
S90 S95 S100
G7 G9 G10 G11 G12 G1X
SD30
SD300 SD400 SD450 SD500 SD550 SD600 SD630 SD700 SD750 SD770 SD780 SD790 SD800 SD850 SD870 SD880 SD890 SD900 SD940 SD950 SD980 SD990
SD1000 SD1100 SD1200 SD1300 SD1400
SX1
SX10 SX20 SX30 SX40
SX100 SX110 SX120 SX130 SX150 SX200IS SX210 SX220 SX230HS SX240HS SX260HS
TX1
NOTE: not all firmware versions are covered so to make sure your camera is usable, go to the link below and follow the easy instructions to confirm suitability…
http://www.chdk.wikia.com/wiki/Downloads
So why a Canon camera? Well, you’ll need one to run a special hack program that only works on this brand and it will transform your camera into a specialized time lapse rig. If you don’t have one of these cameras, or you don’t wish to subject your current Canon camera to the rigours of this program, you can purchase one of the models listed above on eBay or can find on locally in the classifieds, at garage sales or at pawn shops. Depending on the model, you can find them for as cheap as a few dollars. Our current unit is a A530 and cost $10 – it’s a 5 megapixel model which is fine for shooting these movies.
In fact these old beaters are best since you need not worry about breaking or subjecting it to undue stresses. And if it get dropped or wet or whatever, who cares. Just buy another.
Next you will need an SD card, preferably four gigabytes or smaller. Not just because they are cheap but there are some limitations with the program and it’s just simpler to use these smaller cards. A higher speed card is preferable, a class 10, although in my tests any speed card seemed to work well. That’s good as lower speed cards help keep your costs down.
You’ll need batteries for your rig. In some Canon cameras use AA batteries while others use proprietary battery packs. In the former case, rechargeable batteries are recommended (keep several sets on hand). If the latter it’s important that the battery pack is in good shape – test it.
Next, you need to get the Canon hack program which can be found at:
http://www.chdk.wikia.com/wiki/CHDK
The program is free to download and full installation instructions are included on the website. Once the program is in your camera, refer to the on screen instructions to make your settings. There is a bit of a learning curve for this and it’s highly recommend you play and experiment prior to tackling any real projects. And you can contact us too and we can help.
Then, at the same site you will need to download a time lapse program (known as an intervalometer). There will be several listed that will work with your specific set up. We use to two, one that allows long spans between shots (5 seconds to several hours) and a second that does burst shooting with very quick cycle times between shots. Each has it’s own advantage it’s suggested you play with each to learn what they do best. The name of these programs is Easy Intervalometer and Burst Intervalometer – search for these of use any others you can find at the site.
From here you’ll need a tripod. You can buy one of those mini-pods that can be found cheaply. Or use what you already have, either is fine although the former is small and portable and useful if you have to walk in to the site you wish to shoot (as we often do).
Lastly, now that you’ve done some shooting, you will need a software program to put it all together. We use a program called Virtual Dub, which was free and seems to work well. You can import a batch of pictures from your shoot and turn them into a video quite easily. The program has lots of options for editing and manipulation and we like it. There are other programs too, some free, some not, that can be found online.
To get the Virtual Dub program click below…
http://sourceforge.net/projects/virtualdub/
The Canon hack program goes beyond time lapse and at the site you can download programs that allow you to do extended time exposures, motion capture photography and countless other advanced abilities. They are beyond the scope of this article, but it’s worthwhile playing to see what else you can get out of your budget rig.
One project we’ll be tackling next is making an external battery pack for extended operation. This will come in handy if what ever you are photographing requires long drawn out sessions. Our current unit uses only two AA batteries which sometimes drain a bit too quick. The new external battery pack will solve this. There are other mods that can be done too, like remote controls and such, but these tend to make things complicated and quickly add to the cost, and since the theme here is low cost, we’ll avoid discussing these now.
One addition we may do report on is a low cost Ikea egg timer pan head. This allows your camera to rotate while it is doing its business.
Here is what it cost to make our rig:
Canon A530 camera at a pawn shop – $10
2gig SD card (new) – $5
Canon hack program – Free
Mini tripod from Walmart: – $10
Batteries we already had – $0
So $25 for the entire rig and you may be able to do better depending on what you have kicking around. Either way it’s good and cheap, just the way we like it. We also use a large tripod, a Velbon 40, that we already had and we did not include its cost into the mix.
Check out the time lapse video below or to see another we did, click here…
A cool time lapse.
If you wish more information, by all means contact us!
Date: January 2013.
Location: High River, AB.
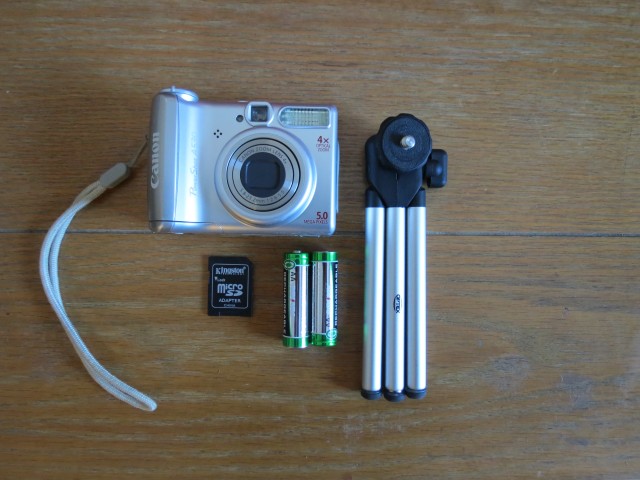
A hacked A530, cheap mini-pod, SD card and batteries. Viola, a budget time lapse rig!


")
")


Keep up the nice job! We have been interested in time lapse for a while but did not know where to start. Your article is great and we will try our hand at it. We have an SX130 that otherwise is out of work that we can use. I will let you know how we do.
Jean-Andre from Belgium
Yes, tell us how you do.
Came here to research some hikes but found this instead. I built a similar time lapse rig using your instructions and love it. It cost me all of $0. You guessed it, I head every thing I need lying around already. Great blog!
Excellent!
Hello! We’ve been following your blog for some time now and finally got the courage to go ahead and give you a shout out from Houston Texas! Just wanted to say keep up the great work. We made your hacked time lapse rig, per your instructions, and love it!
Awesome, have fun with it!
Cheers! Great post! I made mine from an old camera my sister was going to throw away, a rotary egg timer I found at a thrift store, and a home made tripod. Total cost = $3.50!
Now that’s a budget rig!
As always you or both of you, write a great article.
This is fantastic. It just boggles my mind knowing you created this on such a low budget!
Greetings from Mexico!
What a wonderful article! I’m a little unsure about the setup, but as you suggested plan to play a bit. Our SX10 will be coming out of retirement.